 Click Here To Call Us
New Online Options Coming in April Learn More
Category: Homeowner Tips
Dishwashers are one of those conveniences we have gotten so used to we hardly think about them anymore. They are common in most households and used so frequently that we just assume they will always be there for us when we need them. But, just like any other appliances, dishwashers need regular cleaning and maintenance to not only continue to function normally, but to extend the life of the dishwasher. There are simple steps you can take each day, coupled with regular cleaning and maintenance, which will prolong the life of the dishwasher and ensure it continues to clean your dishes effectively and efficiently. The first step you can take to help your dishwasher run as best as possible, is to load it correctly. This may seem simple, but are you really sure you are correctly loading your dishwasher? Break out your owner’s manual and read the instructions so that you know the manufacturer’s recommendation on how to best load your dishwasher. It is important that you do not overload your dishwasher. Just because you can cram one more dish in, does not necessarily mean that you should. It may seem like overloading your dishwasher will save you money because you will not have to run your dishwasher twice, but, in reality, you will not be saving much or anything. When a dishwasher is overloaded, it blocks the sprayers and prevents the dishes from getting properly cleaned. This may necessitate another washing, which eliminates any perceived savings by overcrowding. While you certainly do not need to clean your dishes before putting them in the dishwasher, they should be properly scraped off. Nobody wants to wash their dishes before running the dishwasher, but if you leave too much food on the plate, you can clog up your dishwasher and create major problems. In addition to loading your dishes properly, there is some regular maintenance that will help your dishwasher run effectively and prevent damage from occurring. It may seem counter intuitive to clean your dishwasher, but it is actually very important. By pouring one cup of vinegar in the bottom of your dishwasher and running it on a normal cycle, it will help loosen food particles and clean the inside of your dishwasher so it looks and smells nice. Next, if you have always wondered where the food particles go once the dishwasher cleans your dishes, there is actually a trap that helps collect food particles. The food trap should be removed and cleaned out every so often to ensure that dishes actually come out clean after being washed. Also, just like a shower head can become clogged, so can the sprayer in a dishwasher. DIY Network explains how to maintain your dishwasher sprayers, “The sprayer arms work by spinning to help ensure that sprayed water reaches all of the dish surfaces in both the top and bottom racks of the dishwasher. Water sprays out of the device by means of small holes placed at regular intervals along the arms. Eventually these holes can become clogged with debris particles or dried soap. To help ensure that your dishes get their cleanest, clean out the holes in the spray arms periodically. Soak the arm in a solution of vinegar and water, and use an ordinary pipe-cleaner to clean the holes.” When you regularly clean and maintain your dishwasher, you can prevent damage from occurring, keep your dishes sparkling clean, and prolong the life of your dishwasher so that it will be there for you for years to come.]]>
As the temperatures climb higher and higher, so do energy bills. Nobody wants to waste money on energy bills, especially in a home that is not energy efficient. If you have been looking for some ways to make your home more energy efficient, there are actually quite a few. There are certainly a range of options to make your home more energy efficient, from large scale and expensive to small scale and very inexpensive. Whatever your budget, you can take simple steps to make your home more energy efficient and save on energy bills each month. One of the easiest ways to make your home more energy efficient is to install a programmable thermostat. There is a programmable thermostat for any budget and they are all relatively easily to install. If you do not feel up to installing it yourself, it is easy for a handyman to install it for you. SheKnows explains how to best utilize your programmable thermostat to reduce energy consumption, ” Purchase a programmable thermostat and set your temperature to go up while you are away or asleep during the summer and down while you are away or asleep during the winter. By simply setting your thermostat down (or up) you can save hundreds of dollars a year.” The next thing you will want to do when making your home more energy efficient is to make sure there are no leaks. The seals around windows and doors, over time, tend to wear out. When they wear out and start leaking air, your home quickly loses energy efficiency. If you move a lighter around the seal of a window or door, you might see the flame flicker or move. If you see this happen, it means air is leaking and a repair is needed. The United States Environmental Protection Agency stresses the importance of fixing air leaks in a home to create a more energy efficient space, ” Your home’s envelope – the outer walls, ceilings, windows, doors and floors – may be letting too much air into or out of the home. Hidden gaps and cracks in a home can create as much airflow as an open window, and can cause your heating and cooling systems to work harder. Sealing coupled with insulating your home’s shell is often the most cost effective way to improve energy efficiency and comfort. Windows can also account for a significant percentage of your heating bill in the winter, as cold air can infiltrate into the home through leaky windows and warm air escapes, making your heating system run more. And during the summer, your air conditioner must work harder to cool hot air from sunny windows. If you are replacing or installing windows, doors or skylights, you can reduce energy costs by installing energy-efficient windows, doors, and skylights in your home.” Lastly, another simple way to improve energy efficiency in any home is to add insulation. If you did not build your home, you may not even be aware of how much insulation you have. Your home may not have enough insulation to maintain energy efficiency. Or, if your home is old, it may need new insulation. If you are unsure how much insulation is enough, hire a contractor to come and assess whether you have enough insulation. When you improve just these three simple things, your home will be more energy efficient and you will save money on energy costs each month.]]>
Everyone wants a luxurious bathroom that not only meets their needs but is aesthetically pleasing. Also, it’s important that your dream bathroom matches your design sensibilities as well. If your bathroom does not quite match that description, you may need to consider a bathroom remodel. Whether you like a more traditional style or want to create a modern retreat, when remodeling, your dreams for your bathroom can become a reality. When undertaking a bathroom remodel, or any remodel for that matter, there are some tips to follow that will help streamline your remodel, make it less stressful, and help you ensure that you get the results that you want. The first, and probably most important tip in any remodel project, is to set and stick to a budget. Do research about the types of goals you want to accomplish in your bathroom remodel and plan ahead for the costs associated with them. Be realistic about costs and give yourself some breathing room in your budget if possible in case any surprise costs may arise. Your budget will influence what materials and fixtures you choose and play the most important role in your remodel project. The second tip is to plan for your realistic needs. Think about what will suit your cleaning needs when choosing materials and think about how much storage you will need. You may love the look of pedestal sinks but if you do not have any other storage in your bathroom, you may find yourself wondering where to keep your toothpaste and deodorant. Plan to remodel your bathroom to not only be stylish, but also to fit your lifestyle and needs. The third tip is to DIY (Do It Yourself) where you can but know when to hire a professional. TV shows may make it look simple to DIY just about anything but, it is important to know what you are doing when attempting to DIY a bathroom remodel. While you certainly could save a significant amount of money if you do the bathroom remodel yourself, it will be far more costly if something goes awry. Calling a contractor to fix a problem that you created, paying for additional materials, and any repairs will be much more expensive than if you were to have hired a professional in the first place. If you have the knowledge and skills necessary to do a bathroom remodel yourself, great! But, if you feel that it would go more smoothly in the hands of a professional, hire an experienced and knowledgeable contractor who can make your bathroom dreams a reality. When you follow these three basic tips before beginning your bathroom remodel, you can rest assured that many potential headaches have been avoided and that you will soon have the bathroom that you have always wanted.]]>
Energy efficient, front loading washers and dryers have become incredibly popular. HE (high efficiency) washers and dryers are all the rage in homes right now because not only are they more energy efficient than traditional washers and dryers, but they save money on both energy bills and water bills each month. Front loading washers and dryers can also be stacked, creating additional space in your laundry room or saving room in a small living space. The advantages of owning front loading washers and dryers are many, but like any other appliance, they require maintenance to run properly. Proper maintenance of your front loading washer and dryer is incredibly important to keep it running properly. One major complaint of many homeowners that have front loading washing machines is that, over time, they can start to smell moldy. It is important to always remove damp clothes immediately so that they do not sit for extended periods of time, which can lead to a moldy or mildew-like smell. Additionally, when the machine is not in use, leave the door to the washing machine ajar so that it allows fresh air to circulate. What is often the primary source of mold is the rubber seal around the door. The rubber seal needs to be cleaned regularly to prevent buildup of hair and other debris and to prevent water buildup in the seal. A solution of half vinegar and half water will clean the rubber seal and prevent a moldy smell. And, for regular maintenance, you can pour distilled white vinegar where you would normally put detergent and run the machine as normal. This will help clean everything out and deodorize. Additionally, there are products available specifically formulated to clean the drum of a front loading washer and keep this smelling fresh. Lastly, if you notice that your washer is rattling or shaking, it may need to be leveled. It is incredibly important to level your machine to extend the life of the machine and prevent damage to flooring and walls. Next, it is important to maintain your front loading dryer. As with all dryers, it is necessary to regularly clean the lint filter. Beyond just frequently removing the lint accumulation, every now and then it is a good idea to actually clean the lint trap off with some water at the sink. Another important maintenance step is to check the dryer exhaust, a task often forgotten. It is important that air can easily pass through the exhaust and that there is no debris or buildup in the way. If there is dust and debris, remove any large items and vacuum to get rid of all dust. This will keep your machine functioning as efficiently as possible and extend the life of your dryer. When you regularly maintain your front loading washer and dryer, you protect your investment and help your machines function properly. You will help extend their life and save money using an energy efficient appliance.]]>
The first and most important thing to note when it comes to plumbing is that, the less that goes down a drain (aside from water, obviously), the fewer clogs you will experience. One way you can avoid unwanted things (like hair and debris) from going down the drain is with a drain screen. Drain screens can be used in the kitchen sink, bath tub and shower and are a great preventive measure to protect plumbing. Never allow hair to accumulate or intentionally wash hair down the drain because hair is one of the most common causes of clogs with drains. The next way to protect your plumbing is with some things you probably already have in your pantry. Skip the harsh, chemical cleaners that can actually damage your pipes and get out your vinegar and baking soda. No, it is not time to cook something, it is time to naturally clean your plumbing. First, sprinkle baking soda down the drain. Then, pour about a cup of vinegar down your drain, wait approximately ten minutes, and then pour hot water down the drain. The vinegar and baking soda will help remove buildup and prevent clogs from forming. Another wonderful use of vinegar is for your plumbing fixtures. If you notice buildup or clogs with your faucets or showerhead, fill a plastic bag with vinegar, attach the bag to the faucet or showerhead with a rubber band, wait an hour or two, remove the bag and turn on the faucet or showerhead to flush away the clogs. The vinegar will have broken down the buildup, allowing the water to flow freely. It is truly amazing what common household items like vinegar are capable of doing! Vinegar can be used to clean just about anything! It is incredibly important to regularly maintain plumbing and not ignore growing problems. If you notice you have a slow drain, do not ignore it! The clog will only grow and cause bigger problems. Often, a slow drain can be cleaned easily when first noticed, but if you allow the clog to grow, it may be necessary to bring in the professionals. A home warranty can protect you in case your plumbing does experience problems. Do not panic when you have a problem, wondering what plumber to hire, who you can trust and who will properly fix the problem. A home warranty company, such as Platinum Home Warranty, will handle hiring a reliable and trustworthy plumber and protect your home.]]>
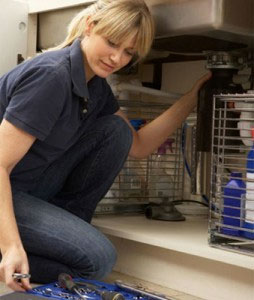 Garbage disposals are one of those appliances you do not give much thought to, but are happy they are there. While you may not think about your garbage disposal very often, you count on it to work when you need it, but do you know how to best take care of it? You cannot simply put anything in your garbage disposal that you want and hope it keeps functioning at an optimal level. There are some basic steps you can follow to properly maintain your garbage disposal and ensure it works when you need it to.
Garbage disposals grind up and dispose of food items so that you do not have to put them in your trash can. They are incredibly handy and convenient. But, not everything, not even every food item, should be put down your garbage disposal. Many items can cause damage and flat out break your garbage disposal. BHG Real Estate discusses what you should and should not put in your garbage disposal, “Certain foods should never be put in the disposal, like anything greasy, stringy, ultra-starchy, fibrous, bony or rocky. That includes melted butter, shortening or bacon grease, celery or carrot sticks and peelings, banana or potato peelings, corn husks, artichoke leaves, steak bones, and avocado and peach pits, among other cloggers. You may have a disposal that can handle some of these items, but don’t try them unless the directions say so.
Some foods may fool you. Chicken skin may seem harmless, but it’s greasy and fibrous. It’s better to be safe than sorry, so if you’re in doubt about a food, use the trashcan instead.” If you find that you have a clog in your garbage disposal, never use your fingers to try to fix the clog. There are sharp metallic blades in the garbage disposal and they could seriously injury you. Instead, use pincers or tongs to try to break up a clog in your garbage disposal.
When you do run your disposal, run the water for an additional 20 seconds after turning off the disposal to make sure everything has rinsed down the drain. Use warm water and lemon peels and run the garbage disposal to get rid of bad smells. Never pour hot grease into your drain because as it cools it will solidify and cause a clog. You should also never use harsh chemical cleaners or bleach to clean your garbage disposal because they can cause damage to the blades. Vinegar is a great natural tool for cleaning your garbage disposal and if you freeze vinegar in an ice cube tray you can put the vinegar cubes through the garbage disposal for additional cleaning and scouring.
If you only grind biodegradable items that are not listed above as bad for your garbage disposal, your garbage disposal should be able to avoid clogs and major problems. From time to time, all garbage disposals will develop bad smells but when you follow the cleaning tips above, you can quickly remedy bad smells. Proper care of your garbage disposal will result in a long lasting, very useful appliance.
]]>You may not think often about your hot water heater, but you probably rely on it every day. And you will not always know exactly how much you need it, until it stops working. Your hot water heater can be maintained regularly to keep it running smoothly so that it is there, when you need it. Water heaters typically have a life of about 10 years, on average, but they can last longer when cared for well and regularly maintained. The first important thing to do when maintaining your hot water heater is make sure the tank is clean. Many experts recommend that you drain your tank regularly in order to keep it functioning properly and to avoid sediment build up. AngiesList points out how important draining your water heater tank is, “Those drips are caused by a buildup of minerals, such as calcium and lime, over the years. One way to help limit the clog is to drain your water heater. “Drain it three or four times a year,” Kenworthy says. “That’s the best way for them not to lime up. When you drain it in the basement, take the water to the sump pump. If your water heater is in the garage, run the water outside. Drainage is one of the biggest things you can do to help your water heater. Other than that, there’s not a whole lot you can do.” When it comes to draining, follow the steps suggested by the manufacturers for that specific tank.” Be sure to turn off the water supply, drain the water and flush any sediment buildup out until the water runs clear. Additionally, you will want to check and regularly replace your anode rode. The anode rod may sound complicated but it is actually relatively easy for most homeowners to change themselves. Yahoo Voices describes the importance of the anode and how to tell if it needs to be changed, “After your hot water tank is 3 years old, start checking the anode rod once a year. Although it is doubtful that you will have to replace the anode rod in your hot water heater so soon, this rod is essential to the health of your water tank. Anode rods work to release ions that prevent the tank from rusting. If the anode rod has been completely depleted, then the inside of the water tank will start to rust, then leak. Use a wrench to loosen the rods from the top of the water tank to check them. After pulling out the rods, check to make sure that they appear solid. If they look a little worse for the wear, plan on buying and installing new anode rods in your hot water tank.” Have an inspector check your water heater if you are concerned it may not be functioning properly. When you regularly maintain your water heater it will be there each day, when you need it, and you will be able to extend the life of your water heater.]]>
The birds are chirping, the sun is shining bright and the air is getting warmer. It is almost time to break out the swimsuits, sunscreen and towels and enjoy swimming season. But before you hop in feet first, you should do some things to prepare your pool so that it is safe and enjoyable for swimming. Break out all of your cleaning supplies. If you have a pool cover, your pool will hopefully not be particularly dirty. But, if you do not have a cover and have taken some time off from keeping it clean, you will most likely have a good amount of debris to clean out. Skim the pool to remove debris and do an assessment to see if there is an accumulation of algae. Sweep the pool and vacuum it to get rid of anything that may have settled on the floor of the pool. With all of the dirt and debris removed, you will be able to start really preparing your pool for swimming. If your pool is low on water, now is the time to add water. Next, check your pool’s filter and backwash as needed. AZCentral discusses how important it is to check your pool’s filter, “If you have a sand filter, you need to backwash until the water runs clear. If you have a DE filter, it needs to be taken apart and cleaned at least twice yearly (this can be more or less frequent depending on the filter size). A dirty filter keeps your water from reflecting a beautiful sparkle, and it also makes the pump work harder, costing more to run.” One of the most important things you can do is test the water’s chemical levels. If any levels are off, it is important to fix the chemical levels in the pool. Chemical test kits are relatively inexpensive and easy to find so do not skip this important step. AZCentral notes the importance of testing chemicals and how important it is to properly maintain your pool, “Correct chemical levels increase the longevity of your pool finishes. Over time, an imbalance in chemicals can lead to high levels of calcium and acids. If this happens, you may need to drain your pool either partially or completely to help dilute the concentration and get back on track.” Once you know your pool is clean and the chemical levels are safe, your pool is ready for swimming and summer fun! Contact us for more information https://www.platinumhw.com/contact/ or by calling 800.871.2339]]>
Spring Cleaning with Platinum Home Warranty
 Spring is here! And even though Arizona is notorious for mild winter conditions, the hustle and bustle of the holiday season, still makes it easy to neglect the maintenance of your home. Now as temperatures begin to warm up, it is time to start thinking about doing some things to prepare for the warmer temperatures. It is important to perform some basic spring home maintenance tasks every year so that your house remains in top working order and you can avoid costly and frustrating home repairs that only arise after periods of neglect.
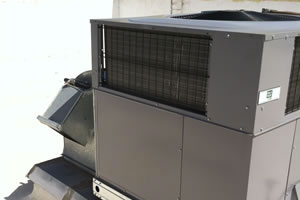
One way to start your spring cleaning projects is to schedule your free 20 point inspection with Platinum Home Warranty during the months of March and April. This 20 point inspection (see the coverage points below) serves as a preseason check to ensure your home systems are up to par for the sweltering Arizona summer. Platinum tries to address any issues foreseen upfront so you have a working system when you need it the most, but it also provides the chance to educate clients about their system and about regular required maintenance. For most people, maintenance on their vehicle such as oil changes is a common and understood practice but for HVAC systems we find that is quite the opposite. Most homeowners have no idea it is imperative to have your coils cleaned regularly to ensure proper operation of the system. If our service technician finds evidence of a maintenance issue, we simply inform and educate our clients so that you can have the needed maintenance done as so it does not void the warranty. We really want our customers to understand the importance of maintenance and the overall effect it has on your systems which is why these checkups are another great opportunity to educate customers and help you get the most out of the warranty.
20 Point HVAC Inspection Checklist
1. Check thermostat calibration
2. Check air filters (leave new one behind)
3. Check and adjust air flow
4. Check and tighten all electrical connections
5. Inspect evaporator coil when accessible
6. Check volt and amp draw on motors
7. Check refrigeration charge
8. Lubricate all moving parts
9. Check start and run caps
10. Visually inspect system for minor refrigeration leaks where accessible
11. Check time delay relay
12. Check contactors
13. Check main electrical whip
14. Check compressor terminals
15. Check disconnect box and fuses
16. Check air conditioner power breaker
17. Check and adjust blower components
18. Check and adjust burners
19. Inspect fan blade
20. Test cycle air conditioner for proper operation
A home warranty plan will allow your buyer to relax, knowing all the comforts inside and around their home are being backed by a warranty they can trust and service they can depend on. We know a home is personal, so at Platinum we take the needs of our clients personally. Platinum’s core commitment to excellence has designated this boutique local company to become the premiere warranty company in Arizona. Help your clients avoid the surprise of expensive repair bills by recommending someone you trust. Contact us for more information at platinumhw.com or call 800.871.2339.
]]>
Spring is here! And even though Arizona is notorious for mild winter conditions, the hustle and bustle of the holiday season, still makes it easy to neglect the maintenance of your home. Now as temperatures begin to warm up, it is time to start thinking about doing some things to prepare for the warmer temperatures. It is important to perform some basic spring home maintenance tasks every year so that your house remains in top working order and you can avoid costly and frustrating home repairs that only arise after periods of neglect.
One way to start your spring cleaning projects is to schedule your free 20 point inspection with Platinum Home Warranty during the months of March and April. This 20 point inspection (see the coverage points below) serves as a preseason check to ensure your home systems are up to par for the sweltering Arizona summer. Platinum tries to address any issues foreseen upfront so you have a working system when you need it the most, but it also provides the chance to educate clients about their system and about regular required maintenance. For most people, maintenance on their vehicle such as oil changes is a common and understood practice but for HVAC systems we find that is quite the opposite. Most homeowners have no idea it is imperative to have your coils cleaned regularly to ensure proper operation of the system. If our service technician finds evidence of a maintenance issue, we simply inform and educate our clients so that you can have the needed maintenance done as so it does not void the warranty. We really want our customers to understand the importance of maintenance and the overall effect it has on your systems which is why these checkups are another great opportunity to educate customers and help you get the most out of the warranty.
20 Point HVAC Inspection Checklist
1. Check thermostat calibration
2. Check air filters (leave new one behind)
3. Check and adjust air flow
4. Check and tighten all electrical connections
5. Inspect evaporator coil when accessible
6. Check volt and amp draw on motors
7. Check refrigeration charge
8. Lubricate all moving parts
9. Check start and run caps
10. Visually inspect system for minor refrigeration leaks where accessible
11. Check time delay relay
12. Check contactors
13. Check main electrical whip
14. Check compressor terminals
15. Check disconnect box and fuses
16. Check air conditioner power breaker
17. Check and adjust blower components
18. Check and adjust burners
19. Inspect fan blade
20. Test cycle air conditioner for proper operation
A home warranty plan will allow your buyer to relax, knowing all the comforts inside and around their home are being backed by a warranty they can trust and service they can depend on. We know a home is personal, so at Platinum we take the needs of our clients personally. Platinum’s core commitment to excellence has designated this boutique local company to become the premiere warranty company in Arizona. Help your clients avoid the surprise of expensive repair bills by recommending someone you trust. Contact us for more information at platinumhw.com or call 800.871.2339.
]]>
The first thing you will want to do to maintain your home this spring is head outdoors. You will want to take a good long look at the exterior of your home, and not just by walking around. Get out a ladder and look at the roof. It is important to inspect your roof for any damage that may have occurred during the cold months of adverse weather. Also, while you are up on your ladder, check out the gutters as they tend to collect debris and leaves as the weather changes. Any clogs or build ups in your gutters can lead to damage for your home as water gets backed up. Give those gutters a thorough cleaning so that your house will be ready for the months to come. Next, you will want to examine the rest of the exterior of your home. Do you see any damage that needs repair or window or door frames that have leaks or cracks? These types of things should be repaired as quickly as possible as they make your home less energy efficient and will cost more on your monthly utility bills. Once you have thoroughly examined and repaired your home, it is time to look around your yard. Have things become overgrown and unkempt? Now is the time to trim back all the bushes and cut the grass so that it will grow in more nicely in warmer temperatures. The leaves have probably begun to pile up by now, so break out the rake and get to work. Get rid of all those piles of leaves so that your yard has room to breathe and grow now. Now you can head indoors and take a look around. One important thing to do that many people forget is to change is air filters. Air filters should be changed often so that your HVAC system can continue to run efficiently and help keep heating and cooling costs down as well as properly heat and cool your home. Another house item that often takes a beating during the winter months is the refrigerator. It is used often for holiday entertaining and because people are just staying home more during the winter. Take the time to thoroughly clean your refrigerator and vacuum the refrigerator coils as they tend to collect dust. Lastly, it is important to check your smoke detector batteries often to ensure they are working correctly. Smoke detectors save lives every day and it is good to check them frequently to protect you and your family. By doing these things, you can keep your house running properly and avoid costly repairs.]]>


Mailing Address
16211 N Scottsdale Rd Suite A6A-478
Scottsdale, AZ 85254
